Skip to Main Content

Giving IV Fluids at Home, CADD® Solis

Many St. Jude patients receive fluids by IV (by vein). We use IV fluids to increase fluid levels that are too low. These fluids also correct the balance of certain minerals in the body called electrolytes. Electrolytes control muscle action, the amount of water held by the body, and other body functions. IV fluids may include dextrose and electrolytes such as sodium, potassium, magnesium, phosphates, and bicarbonate.

You use the bag of fluid only 1 time, and then throw it away in the regular household trash. 

If the doctor prescribes IV fluids, follow the directions closely for your child’s safety. 

Remember: Try to keep your work area sterile (germ-free) when you connect or disconnect your child’s central venous line from a pump. 

Storage of IV fluid bags

You will receive your child’s IV fluid bag with tubing attached and ready to use.

Where you store the IV fluid bag before your child needs it depends on the type of IV fluid your child gets. You need to store some IV fluid in the refrigerator. Other IV fluids must be stored in a dry place, not in the refrigerator. These details will be printed on the label. 

If you need to store your child’s medicine in the refrigerator, the temperature should be 36 degrees F to 46 degrees F (2 degrees C to 8 degrees C).

Let the IV fluid bag warm up before you start giving your child the medicine. You can take the IV bag out of the refrigerator about 1 hour before giving it to your child. Do not warm the IV fluid bag by placing it in the sun, oven, microwave, or other heat source. 

Do not use the CADD Solis Pump while bathing, showering, or swimming.

Preparing to use the CADD Solis® pump

  • Clean your work area with an alcohol prep pad or other disinfectant.
  • Clean your hands with soap and water and dry well or use an alcohol-based liquid or foam hand cleaner.
  • Gather your supplies and place them on the clean work area.

Supplies needed

  • IV bag of fluid with cassette and tubing
  • 1 syringe of sterile sodium chloride (saline for IV use). Check label for:
    • The name “0.9% Sodium Chloride Injection” on the syringe
    • 5 mL of liquid in the syringe
    • The expiration date on the syringe is still in the future
  • 2 Site Scrubs® (If you do not have Site Scrubs, you may use 2 alcohol prep pads.)
  • Medical tape, if needed to secure the line
  • X-span® mesh (use as a onesie if your child is a baby or T-shirt if your child is a toddler)
  • CADD Solis Pump
  • 4 AA Batteries

All supplies and IV fluids must be used only 1 time and should be thrown away in the regular trash after use.

Check the IV fluid bag

Before each infusion, check the IV fluid bag:

  • For your child’s name and for the correct medical record number, if available
  • For the type of fluid ordered by the doctor
  • For the volume, rate, and time of infusion
  • For the expiration date
  • For storage instructions
  • To make sure the bag is not leaking and that the liquid in the bag and the tubing is clear—not cloudy, discolored, or specked

If the liquid in the bag or in the tubing is cloudy, discolored, or speckled, do not infuse the liquid.

If the IV bag is leaking or damaged, do not infuse the liquid. Throw the liquid away and call your home infusion nurse right away. This would be the person who gave you the medicine.

Attaching infusion cassette

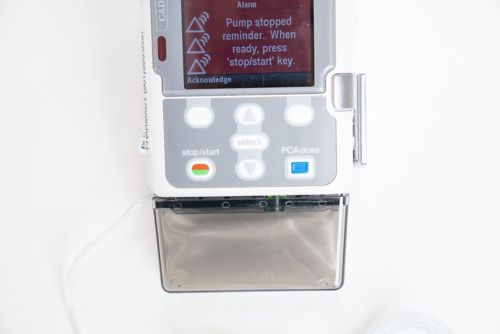
CADD Solis Pump

Insert the infusion cassette into the bottom of the pump.

  1. Clean your hands with soap and water and dry well or use an alcohol-based liquid or foam hand cleaner.
  2. Turn on the pump by pressing the gray button on the right side of the pump. Check battery indicator on the screen, top right corner. If low, change batteries.
  3. Lower cassette arm into the open position.
  4. Remove the blue clip from the cassette, if present, then insert the cassette hooks into the hinge pins on the bottom of the pump.
  5. Swing the cassette up into the latch position.
  6. Place the pump upright on a firm, flat surface. Press down so the cassette fits tightly against the pump. You will hear a click.
  7. Lift the cassette arm up to the closed position.
  8. Once the cassette is in place, the display will ask if you want to reset the reservoir volume. If the reservoir volume does not match what was prescribed for your child, please call your doctor, nurse practitioner, or home infusion nurse right away. If it is after normal clinic hours, please call the Infusion Center at 901-595-2441 or the home infusion nurse.
  9. If the reservoir volume is correct, press the button located under the word “Yes” at the bottom right of the screen.
  10. The display will then say, “Prime Tubing?” Press the button located under the word “No” at the bottom left of the screen unless taught otherwise by a member of your child’s care team.
  11.  The display will now say “Start Pump?” Follow the directions below to start the infusion.

Starting the infusion

  • Put your child in a safe place where you can easily reach the central line, the IV fluid line, and pump.
  • Clean your hands for 15–20 seconds with soap and water or an alcohol-based hand cleaner. Use paper towels to dry your hands. Then, use the paper towels to turn off the faucets.
  • Take off the old X-span mesh, and untape the central line as needed.

1. Prepare the saline syringe

  • Remove the cap from the saline syringe as you were taught without touching the inside of the cap or the tip of the syringe. Set the cap down so the inside is facing up.
  • Holding the syringe upright, pull back on the plunger of the syringe. Look for any large air pockets and thump out the bubbles. Slowly, push the air out of the syringe and stop when the top of the plunger is at the 5mL mark.
  • Place the cap back on the syringe. Be careful not to touch the inside of the cap or the tip of the syringe. The saline syringe can now be laid down on the table. It is ready to use.

2. Clean the connector

  • Open 2 Site Scrubs and place them on the clean work area.
  • On your child’s line, remove the disinfectant cap from the connector.
  • Using a Site Scrub, scrub with a back-and-forth motion for 10 seconds and let dry for 5 seconds. If using an alcohol pad, wipe the end of the connector for 8 seconds on the top and 8 seconds around the rim in the grooves and let dry for 15 seconds.
  • Do not blow on or fan the connector.
  • After the connector is clean, do not lay it down.

3. Flush the line with saline

  • With your free hand, pick up the saline syringe and remove the cap as you were taught without laying down the connector.
  • Attach the saline syringe to the connector. Unclamp the central line and flush with saline, using a pulsing motion as you were taught.
  • Clamp the line.
  • Remove the syringe.

4. Clean the connector again

  • Using a Site Scrub, scrub with a back-and-forth motion for 10 seconds and let dry for 5 seconds. If using an alcohol pad, wipe the end of the connector 8 seconds on the top and 8 seconds around the rim in the grooves and let dry for 15 seconds.
  • Do not blow on or fan the connector.
  • After the connector is clean, do not lay it down.

5. Start the infusion

  • Remove the cap from the end of the IV tubing and connect to the cleaned connector.
  • Unclamp the IV tubing and unclamp your child’s central line.
  • Check the lines for kinks or other blockages before you start the pump.
  • You will see the words “Start Pump?” Press the button located under the word “Yes” at the bottom right of the screen.
  • The orange light at the top left of the display blinks if the pump stops or an alarm exists. If this light stays on, the pump is not working. Call the Infusion Center or the home infusion nurse.
  • The green light at the top left of the display blinks every 3 seconds when the pump is running and delivering fluid. You can hear the pump motor when the pump is infusing.

Medicine side effects

All medicines, including IV fluids, have possible side effects. Some are mild and some are more severe. Please look at the information you received when your child’s fluid bag was first delivered. If you have questions or concerns that your child might be having an allergic reaction, stop the infusion and call the Infusion Center at 901-595-2441.

Call 911 if your child has a medical emergency and needs help right away.

Ending the infusion

When the pump display reads, “Reservoir Volume is Zero, pump stopped,” the infusion of IV fluids is complete.

  • Press stop/start to stop the pump. When “Stop the Pump?” appears on the display, press “Yes.” Power down the pump by pressing the gray power button on the right side of the machine 
  • Clamp the IV tubing.
  • Clamp your child’s central line.
  • Put your child in a safe place where you can easily reach the central line and the IV fluids.
  • Clean your work area with an alcohol prep pad or other disinfectant.
  • Clean your hands with soap and water and dry well or use an alcohol-based liquid or foam hand cleaner.
  • Gather your supplies and place them on the clean work area.

Supplies needed

  • 3 Site Scrubs (If you do not have Site Scrubs, you may use 3 alcohol prep pads)
  • 1 syringe of sterile sodium chloride (saline for IV use). Check label for:
    • The name “0.9% Sodium Chloride Injection” on the syringe
    • 5 mL of liquid in the syringe
    • The expiration date on the syringe is still in the future
  • 1 syringe of heparin flush 10 unit. Check label for:
    • The name “Heparin Lock Flush 10 USP units/ml” on the syringe
    • 3 mL of liquid in the syringe
    • The expiration date on the syringe is still in the future
  • 1 disinfectant cap
  • Medical tape, if needed to secure the line
  • X-span® mesh (use as a onesie if your child is a baby or T-shirt if your child is a toddler)

1. Prepare the saline syringe

  • Remove the cap from the saline syringe as you were taught without touching the inside of the cap or the tip of the syringe. Set the cap down so the inside is facing up.
  • Holding the syringe upright, pull back on the plunger of the syringe. Look for any large air pockets and thump out the bubbles.
  • Slowly, push the air out of the syringe and stop when the top of the plunger is at the 5mL mark.
  • Place the cap back on the syringe. Be careful not to touch the inside of the cap or the tip of the syringe. The saline syringe can now be laid down on the table. It is ready to use.

2. Prepare the heparin syringe

  • Remove the cap from the heparin syringe as you were taught without touching the inside of the cap or the tip of the syringe. Set the cap down so the inside is facing up.
  • Holding the syringe upright, pull back on the plunger of the syringe. Look for any large air pockets and thump out the bubbles.
  • Slowly, push the air out of the syringe and stop when the top of the plunger is at the 3 mL mark.
  • Place the cap back on the syringe. Be careful not to touch the inside of the cap or the tip of the syringe. The heparin syringe can now be laid down on the table. It is ready to use.

3. End the infusion

  • Open 3 Site-Scrubs and place on the clean work area.
  • Clean your hands for 15–20 seconds with soap and water or alcohol-based hand sanitizer. Use paper towels to dry your hands. Then, use the paper towels to turn off the faucets.
  • Remove the IV tubing from the connector of your child’s central line.

4. Clean the connector

  • Using a Site Scrub, scrub with a back-and-forth motion for 10 seconds and let dry for 5 seconds. If using an alcohol pad, wipe the end of the connector 8 seconds on the top and 8 seconds around the rim in the grooves and let dry for 15 seconds.
  • Do not blow on or fan the connector.
  • After the connector is clean, do not lay it down.

5. Flush the line with saline

  • With your free hand, pick up the saline syringe and remove the cap as you have been taught without laying down the connector.
  • Attach the saline syringe to the connector. Unclamp the central line, and flush with saline, using a pulsing motion as you were taught.
  • Clamp the line. Then, remove the syringe.

6. Clean the connector again

  • Using a Site Scrub, scrub the connector with a back-and-forth motion for 10 seconds and let dry for 5 seconds. If using an alcohol pad, wipe the end of the connector 8 seconds on the top and 8 seconds around the rim in the grooves and let dry for 15 seconds.
  • Do not blow on or fan the connector.
  • After the connector is clean, do not lay it down.

7. Flush the line with heparin

  • With your free hand, pick up the heparin syringe and remove the cap as you have been taught without laying down the connector.
  • Attach the syringe to the connector. Unclamp the central line and flush the line with most of the heparin. When the plunger reaches the 1mL mark on the syringe, do a steady push to finish the flush. While holding pressure on the plunger, clamp the central line. This helps keep the line open and free from blood.
  • Remove the heparin syringe.

8. Clean the connector again

  • Using a Site Scrub, scrub the clave with a back-and-forth motion for 10 seconds and let dry for 5 seconds. If using an alcohol pad, wipe the end of the connector 8 seconds on the top and 8 seconds around the rim in the grooves and let dry for 15 seconds.
  • Do not blow on or fan the connector.
  • After the connector is clean, do not lay it down.

9. Cap the line

  • Remove the cover from the disinfectant cap and attach the cap to the connector. Alcohol will spill from the cap, and your hand may get wet when you attach the cap to the connector. This is OK. You may now lay down the line.
  • Loop the line and put on X-span mesh if your child is an infant or toddler.
  • Throw the empty IV bag and syringes into the regular trash.
  • Clean your hands again.
  • To prevent the pump from continuing to alarm, press the power button on the right side of the machine. The screen will display “Power Down.” Press “Yes” on the right side of the screen. Follow the directions in the next section to remove the IV bag and tubing from the pump.

Removing the infusion cassette

  • Lower cassette arm into the open position.
  • Remove the cassette from the pump and raise the cassette arm back into the closed position.
  • Throw away the IV tubing and bag as you were told by the doctor or nurse.

Problems and troubleshooting

Stop the infusion and call the Infusion Center right away if:

  • The fluid bag or tubing begins to leak during the infusion
  • The infusion stops before all the fluid is given
  • The IV site becomes red or swollen
  • You see leaking or drainage from the IV site

Troubleshooting alarms

What you see on screen What might be causing the problem What you can do about it
Screen is blank and alarm is sounding The pump has lost power and is no longer delivering fluid. The pump was delivering and the batteries were removed or the battery door was opened.  Clear this alarm by replacing the batteries or closing the battery door. Then turn the pump back on or the alarm stops after the power has been off for at least 2 minutes. 
Battery depleted. Pump stopped. Battery is dead. Pump is not running. Install 4 new AA batteries right away.
Battery low, replace battery Battery power is almost used up. Change the 4 AA batteries soon. 
Downstream occlusion A blockage between the pump and the patient Check line for kinks. Make sure the central line clamp is open. The pump should start again when the blockage is gone. 
Upstream occlusion A blockage between the fluid bag and the pump Check line for kinks. Make sure the tubing clamp is open. The pump should start again when the blockage is gone.
Reservoir volume low The infusion is almost complete. Gather supplies for flushing central line with saline and heparin.
Reservoir volume is zero. Pump stopped The infusion is complete. Press the button directly below the word "acknowledge" in the lower left screen. Disconnect the line following the steps above. Then, flush with saline and heparin. 
Cassette was partially unlatched The cassette latch has been pulled forward to the open position. Fully remove the bottom cassette and then reattach the cassette as instructed before. 

Changing the batteries

If a message on the screen says, “Battery low, replace battery,” you will need to replace the batteries.

To change the batteries, follow these steps:

  1. Press the stop/start key.
  2. “Stop Pump?” displays. Press “Yes.”
  3. Turn the knob on the battery door counter-clockwise and open the battery door.
  4. Remove the 4 used batteries.
  5. Insert 4 new AA batteries following the diagram inside the battery compartment.
  6. Close the battery door, turn the knob on the battery door clockwise to lock.
  7. Press the power switch to turn on the pump.
  8. The screen displays “Do you want to start a new patient?” Press “No.”
  9. Press stop/start key to start the pump.
  10. “Start Pump?” displays. Press “Yes.”
  11. If you do not change the batteries while they are low, the alarm will sound, and the orange light will no longer flash. Change the batteries as described above.

If you are unable to troubleshoot your CADD Solis pump or have questions, call the Infusion Center at 901-595-2441 or your home infusion nurse.


Reviewed: August 2022