Skip to Main Content

Suprapubic Catheter Care and Bladder Training

What is a suprapubic catheter?

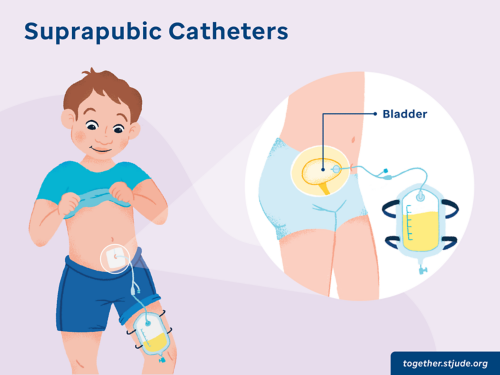
A suprapubic catheter is a tube that goes into your child’s bladder through the belly. You might also hear it called an SP catheter. A doctor makes a small hole in the lower belly to put the catheter into the bladder. The hole is called a stoma. An SP catheter carries urine (pee) from the bladder to a drainage bag that collects the urine.

Your child might need an SP catheter if they:

  • Leak urine
  • Are unable to urinate
  • Have certain other health problems

While your child has an SP catheter, make sure they drink plenty of fluids. This helps the urine stay clear and flow easily. Keep track of how much urine your child makes.

illustration showing boy with suprapubic catheter and how it is attached to bladder

A suprapubic catheter is a tube inserted into the bladder through a hole in the belly.

How to care for the stoma

You should care for your child’s stoma every day. This helps prevent infection and skin problems. Follow these steps to clean this area:

  • Wash your hands with soap and water and dry well, or use an alcohol-based hand sanitizer. You do not need to wear gloves.
  • Take off the dressing (bandage) if there is one.
  • Use soap and water to clean the catheter where it leaves the body. This can be done during your child’s daily sponge bath. Be careful not to pull on the catheter. Rinse the area with warm water and pat it dry.
  • Clean any dried blood or mucus away with hydrogen peroxide blended with an equal amount of water. You can mix the hydrogen peroxide and water in a medicine cup. Water from your tap is fine. Use a cotton ball or cotton-tipped swab to gently wipe the skin around the catheter. Rinse with warm water on another cotton ball or cotton swab. Pat dry.
  • Check your child’s skin daily. Some redness and clear fluid draining from the area is normal.
  • Put on a new dressing (bandage) if the old one looks dirty or wet.

How to care for the urinary drainage bag

Your child will have a drainage bag that collects the urine. The bag can be hung from a bed or wheelchair. Some patients may have a leg bag which can be strapped onto the leg to allow your child to move more easily. Wear gloves if instructed by your care team and always follow your care team’s instructions for emptying and changing the bag.

  • Limit the movement of the drainage bag to keep the tube from coming out.
  • Keep the bag below the level of your child’s bladder so urine does not back up.
  • Keep the bag off the floor.

How to empty the drainage bag

Empty the bag when it is 2/3 full, or at least every 8 hours even if it is not full. How often you need to empty the bag will depend on the size of the bag and how much urine your child makes.

  • Wash your hands well with soap and water and dry well or use an alcohol-based hand sanitizer. Put on gloves if you have them or if told to use them.
  • Put an empty container under the drain spout and open the spout to let urine drain out. You may also empty the urine into the toilet.
  • Do not touch the spout to the container or touch the spout with your hands. Clean the spout with an alcohol wipe if you do either of these things.
  • Close the spout when the bag is empty.
  • Pour urine into a toilet to discard.

How to change the drainage bag

Change the bag once a week. Change the bag right away if it gets dirty, cut, or torn, or if it starts leaking. Otherwise, germs could get in and cause an infection. If the urine bag falls off the catheter tubing, clean the end of the tube and put on a new bag.

Follow these steps to change the drainage bag:

  • Clean your hands with soap and water and dry well, or use an alcohol-based hand sanitizer.
  • Gather the following supplies:
    • A new drainage bag
    • A new stopcock, if your child’s bag uses one
    • Red cap, if needed
    • Alcohol pad or Site-Scrub®
  • Connect the new stopcock, if you have one, and the new bag before you take the old bag off.
  • Bend the catheter over to keep urine from leaking if you do not have a stopcock.
  • Take the old bag off. Take off the old stopcock if you have one.
  • Clean the end of the catheter with a Site Scrub or alcohol pad.
  • Connect the new bag.
  • Check the tubing for kinks. These can keep urine from draining into the bag.

How to clean (flush) the tubing

A flush with saline or water can help keep the tubing from being blocked. Flush the tubing 1 time each day or as instructed by your care team.

You might need to flush the tubing more often if:

  • The catheter drains less than usual or stops draining
  • Your child’s urine looks bloody
  • Your child’s urine has mucus in it
  • The urine looks cloudy or “milky.” If your child’s SP catheter does not drain all the urine from the bladder, it can cause crystals, or stones, to form in the bladder. Your child’s urine might look cloudy or milky if your child has a bladder infection.

Clean your hands with soap and water and dry well, or use an alcohol-based hand sanitizer. You may wear non-sterile gloves after cleaning your hands.

Gather these supplies:

  • Sterile saline or sterile water to flush the tube
  • 10 mL syringe
  • Alcohol pad
  • Red cap, if needed
  • Sterile top for drainage bag or sterile gauze pad, if needed
  • Mild soap, water, and wash cloth

Put 10 mL of saline or sterile water into the syringe. This liquid is called the flush.

If the bag has a stopcock

  • Open the tap toward your child, so “OFF” points to the bag.
  • Remove the red cap and clean the flush port with an alcohol pad.
  • Connect the syringe to the flush port.
  • Slowly push the 10 mL flush into the flush port. Do not force the flush.
  • Pull back slowly on the syringe until you see urine. Once you see urine, stop.
  • Turn the tap toward the flushing port. This allows fluid to drain from your child’s body into the bag.
  • Take the syringe off the flush port.
  • Scrub the flush port well by rubbing it firmly all over with an alcohol wipe.
  • Put a new red cap on the flush port.
  • Clean the tubing daily. Use mild soap and water on a bath cloth to wipe the catheter tubing from the entry to the stoma around the tubing and down 8 inches.

If the bag does not have a stopcock

  • Wipe the connection between the bag and the catheter with an alcohol pad.
  • Take the drainage bag off the catheter tubing.
  • Put a sterile top or sterile gauze over the open end of the drainage bag. This keeps it clean until you put the catheter tubing back on it.
  • Connect the syringe to the catheter tubing.
  • Slowly push the 10 mL of flush into the tubing. Do not force the flush.
  • Pull back slowly on the plunger of the syringe until you see urine. Once you see urine, stop.
  • Take the syringe off the tubing and put the leg bag back in place.
  • Clean the tubing daily. Use mild soap and water on a bath cloth to wipe the catheter tubing from the entry to the stoma around the tubing and down 8 inches.

If urine does not flow out, repeat the flush. If urine still does not flow, call the hospital.

If it is hard to push the saline or water flush into the catheter, do not force it. This could damage your child’s bladder.

How to change the catheter

An SP catheter needs to be changed every few weeks. Your care team may teach you how to do this. Find more information on how to change a suprapubic catheter.

When to call the hospital

Call the hospital if you notice that:

  • A lot of fluid is draining or leaking around the catheter (a small amount is normal).
  • Your child has any of the following signs of infection:
    • a fever
    • acts irritable
    • has redness and pain around the catheter or in their back
    • the urine or fluid draining around the catheter smells bad
  • The urine is cloudy and does not turn clear after you flush the catheter.
  • You see blood in your child’s urine.
  • The catheter stops draining 6 to 8 hours after you change it.
  • The catheter is clogged and does not flush easily.

Go to the hospital right away if your child’s catheter comes out or you pull it out by accident. The SP catheter has an internal balloon to hold it in place in the bladder. If the balloon is not deflated, the catheter can harm the bladder when it is pulled out.

Catheter-associated urinary tract infection (CAUTI)

Germs can travel through the catheter and cause an infection in the bladder or kidney. This is called a catheter-associated urinary tract infection (CAUTI). It can be serious and lead to other infections.

People with urinary catheters have a much greater chance of getting a urinary tract infection (UTI) than people who don’t have catheters. The urinary system includes the bladder and the kidneys. Germs do not normally live in these areas. But, if germs get inside the bladder or kidneys, an infection can occur.

Symptoms of a urinary tract infection

Signs and symptoms of a urinary tract infection may include:

  • Blood in the urine
  • Cloudy or abnormal color of urine
  • Pain or burning when urinating
  • Pain or pressure in the back or lower abdomen (below the stomach)
  • A need to urinate often or an increase in how often your child urinates after the catheter is removed
  • Urine or catheter smells bad or has an odor
  • Fever

Some people can have an infection without any of these symptoms. Contact your doctor right away if you think your child may have an infection.

Bladder training at home

Your child’s bladder will need to be trained to work as it did before your child had a catheter. It takes time to learn to feel the urge to urinate. Your doctor or nurse will tell you when to begin bladder training.

The goal of bladder training is to increase the amount of urine that comes through the urethra and decrease the amount that drains through the catheter. You will only do bladder training while your child is awake.

How to do bladder training at home

  • Have your child try to urinate in the toilet. Use a container to catch the urine. Do this at least every 3 hours.
  • Keep the catheter clamped at other times when your child is awake.
  • Measure the amount of urine your child was able to pass. Write the amount on your child’s urine log. Then do the following:
    • Unclamp the catheter and drain the urine left in your child’s bladder into the drainage bag.
    • Clamp the bag. Measure the amount in the bag, and write the amount on the urine log.
    • Add the amount your child urinated and the amount from the catheter together. This is your child’s total urine amount.

Catheter removal after bladder training

Your doctor will let you know when your child no longer needs a catheter. This is usually when less than 50–75 mL of urine comes through the catheter each day. This is a little less than 3 ounces. Let your doctor know when your child drains only this amount through the catheter.

The stoma should close within 48 hours (about 2 days) after the doctor removes the catheter. If urine leaks out before it closes, you may put gauze over the hole. Replace the gauze when it gets wet or dirty.

Your child should not take a bath or go swimming for 48 hours (about 2 days) after the catheter is removed. A shower is OK.

If you have questions about your child’s SP catheter, please talk to your care team.

Key points about suprapubic catheters

  • A suprapubic (SP) catheter is a tube that goes into your child’s bladder through the belly.
  • You should care for your child’s stoma and tubing every day to make sure it works properly and to prevent infections.
  • Each day, use mild soap and water on a bath cloth to wipe the catheter tubing from the entry to the stoma around the tubing and down 8 inches.
  • Your child’s bladder will need to be trained to work as it did before your child had a catheter.  


Reviewed: October 2022