Skip to Main Content

Deferoxamine Infusion Using Graseby™ Pump

The doctor has decided to give a medicine called deferoxamine (Desferal®) to get rid of some of the excess iron that has built up in your child’s body. Deferoxamine binds with iron and helps remove it from the body. The medicine is given as an infusion into the fatty part of the skin over several hours.

Getting ready

  • Wash your hands with soap and water. Dry them well. Or use an alcohol-based hand sanitizer.
  • Clean a workspace with an alcohol prep pad. Throw away the alcohol pad.
  • Gather the supplies and open them onto this workspace.

Supplies needed

  • Syringe of deferoxamine
  • Subcutaneous (sub-Q) needle infusion set
  • Alcohol pads
  • Graseby™ pump
  • 9-volt battery
  • Bio-occlusive dressing
  • Tape
  • If needed to numb the skin: EMLA cream and a bio-occlusive dressing (clear plastic, protective dressing that is sticky on one side). Apply this 30–60 minutes before starting the infusion procedure.

Procedure

  1. Read the label on the deferoxamine for instructions. Check the expiration date.
  2. Wash your hands again.
  3. Remove the sterile cap from the deferoxamine syringe. Do not touch the sterile end of the syringe and do not lay it down. Secure the syringe to the pigtail of the sub-Q needle set. Leave the needle covered.
  4. Remove air from sub-Q set by gently pushing on the plunger until the medicine reaches the needle.
  5. Select one of these infusion locations:
    • Back of upper arm
    • Front of thigh
    • Abdomen (except for the navel and the waistline)
      Rotating the infusion sites daily is important so that the fat areas do not get irritated and scarred.
  6. Clean the chosen site with alcohol, starting in the center and wiping outward in a circle about 2 inches. Let the site dry. Do not blot or wipe. Do not blow on the clean skin.
  7. Pick up sub-Q needle and remove cover from needle.
  8. Pinch the cleaned skin and fat between your thumb and first finger. Be careful not to touch the site itself.
  9. Hold the needle between the thumb and first finger of the other hand. Insert the needle into the skin quickly like a dart. The quicker you insert the needle the less it hurts. The needle goes straight into the pinched skin. Then, release the skin.
  10. Place the bio-occlusive dressing over the needle and a piece of tape over the tubing about 3 inches away from the site.
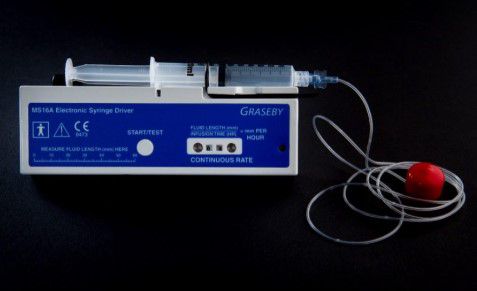
  11. Load syringe into the Graseby™ pump and secure the syringe with the adjustable strap. 
Graseby pump

This is the Graseby pump that will be used on your child.

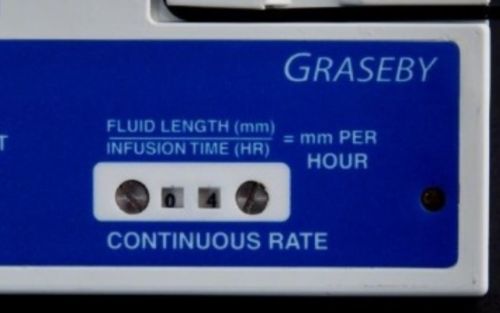
  • Make sure that the pump is programmed with your child’s hourly rate in mm.
Graseby pump

For safety check the rate which is shown in the above picture. Ensure it is programmed with the hourly rate in mm as ordered by the doctor.

  • Insert 9-volt battery
    • Slide off the cover at the back of the syringe pump
    • Push in battery (see label in the battery compartment for proper fit).
    • The pump will beep about 15 seconds after the battery is fitted.
    • Slide cover on again until it latches shut.

    12. Press the start button to start the pump.

End of infusion

13. Check to make sure that the syringe is empty.

14. Remove the bio-occlusive dressing and needle from the skin. Discard the needle in a sharps container.     

15. Gently remove the syringe and throw away in regular trash.

Alarms

The syringe pump will give an alarm lasting about 15 seconds:

  • When the battery is put in
  • When the start button is pressed for longer than 5 seconds
  • When the syringe is empty
  • When the syringe driver has stopped. This might be caused by a blockage or trapped infusion line.

The indicator lamp will stop flashing:

  • When the syringe driver has stopped and switched off
  • When the battery needs replacing

Troubleshooting

Problem Possible cause Action
 The syringe driver will not start. The start button has not been pressed in enough.  Press again. 
 There is no battery. Replace the battery.
The battery was placed in the wrong direction.  Refit battery.
The battery is exhausted. Replace the battery.
The syringe drive is faulty.  Service needed. Call your infusion company for help. 
The infusion is going too quickly or has ended early. Wrong rate set. Correct error. Call your infusion company for help. 
Syringe plunger push-button or finger grips were not held in the actuator or case correctly. Correct error. Call your infusion company for help.
Plunger position measured wrong. Correct error. Call your infusion company for help. 
Line was filled after the plunger position was measured. Correct error. Call your infusion company for help. 
Syringe driver has got wet. Remove from use right away. Call your infusion company for help. 
The infusion is going too slowly. Wrong rate set. Correct error. Call your infusion company for help.
Plunger position measured wrong. Correct error. Call your infusion company for help.
The syringe driver has stopped before emptying the syringe. Exhausted battery. Replace battery.
Blocked or trapped infusion line. Clear line. Call your infusion company for help.
The syringe driver has stopped with the lamp still flashing. The mechanism for pushing the plunger has worn out. Listen for a faint click when the motor turns a few times. Service needed. Call your infusion company for help.

Questions?

If you have questions, please call the Specialty Infusion Pharmacy at 901-595-7464.


Reviewed: September 2022